Let me tell you something about store-bought cat toys.
I used to buy them all the time. Whatever looked cute at the pet store—colorful feathers, jingly balls, fuzzy mice with googly eyes—I’d grab it for my cat Lucky. And he’d play with it for a day, maybe two. Then it would end up under the couch, forgotten.
Until one day I found one with a torn seam. Out came this weird, synthetic stuffing that looked like it came from a factory floor. I had no idea what it was made of. Plastic? Chemicals? Something that definitely didn’t belong in my cat’s mouth?
That was the moment I thought: I can do better than this.
So I decided to make Lucky a toy myself. With my own hands. Using nothing but pure wool, a simple needle, and his two favorite things in the world—catnip and something that makes noise.
It started with a simple wool ball. Just a round, bouncy little thing. Lucky went absolutely crazy for it. He batted it around the living room, carried it in his mouth, even tried to hide it under the rug.
So I thought: why not try something more ambitious? A fish. Cats love fish, right?
Well. My first fish was… let’s just say it was ambitious. Way too big. Looked more like a whale than a fish. Lucky gave it one sniff and walked away. I couldn’t blame him—it was ridiculous.
But I didn’t give up. I made it smaller. Then smaller again. I tweaked the shape, simplified the design, made it cuter and more cat-friendly. And finally—finally—I got it right.
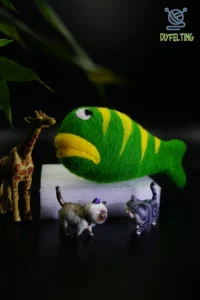
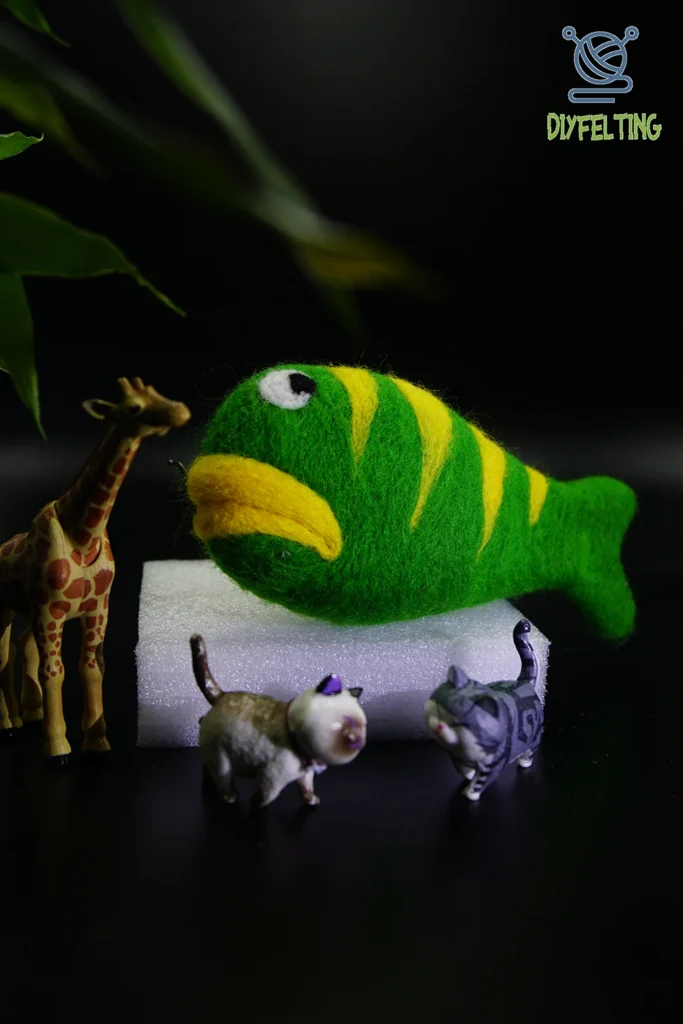
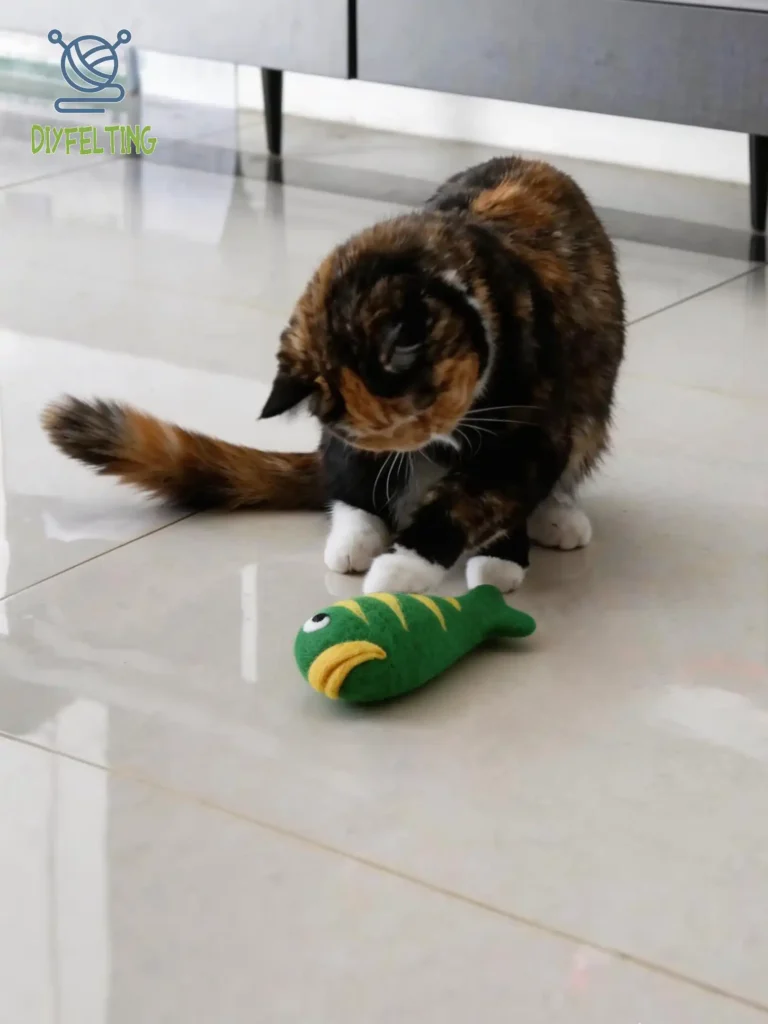
Now Lucky has a whole collection. Blue fish (happy face). Green fish (grumpy face). Each one has a surprise inside—either a jingle bell or a little squeaker that sounds like a cat. And every single one is packed with his favorite organic catnip.
The best part? He plays with them constantly. Like, constantly. I’ll find them in his bed, under the couch, once even in my shoe. He carries them around like trophies.
And making them? It’s the most relaxing thing I do all week.
So today I’m going to show you how to make one yourself. This easy felted cat toy tutorial breaks it down into four simple steps. No experience needed. No fancy equipment. Just you, some wool, and an afternoon of the coziest, most satisfying crafting you’ll ever do.
Why Handmade is Better (For Both of You)
Before we dive in, let me tell you why I’ll never go back to store-bought.
For Lucky: He gets pure wool—no mystery fibers, no plastic bits, no chemicals. Just soft, natural material that’s safe to mouth and kick and carry around. Plus I get to choose exactly what goes inside: his favorite sounds, his favorite smells, everything.
For me: I know exactly what he’s playing with. No more worrying about weird stuffing or cheap materials. And honestly? The process itself is therapy. Sitting quietly, poking wool, watching something take shape under my hands—it melts the stress right out of me.
For the planet: Wool is renewable, biodegradable, and sustainable. When a toy finally wears out (which takes a while—felted wool is surprisingly tough), it won’t sit in a landfill forever.
Win-win-win.
What You’ll Need
The supply list is short and simple:
Wool roving (core wool for the inside, plus colored wool for the fish)
Felting needle (barbed, designed to tangle wool fibers)
Foam pad (protects your table and your needle)
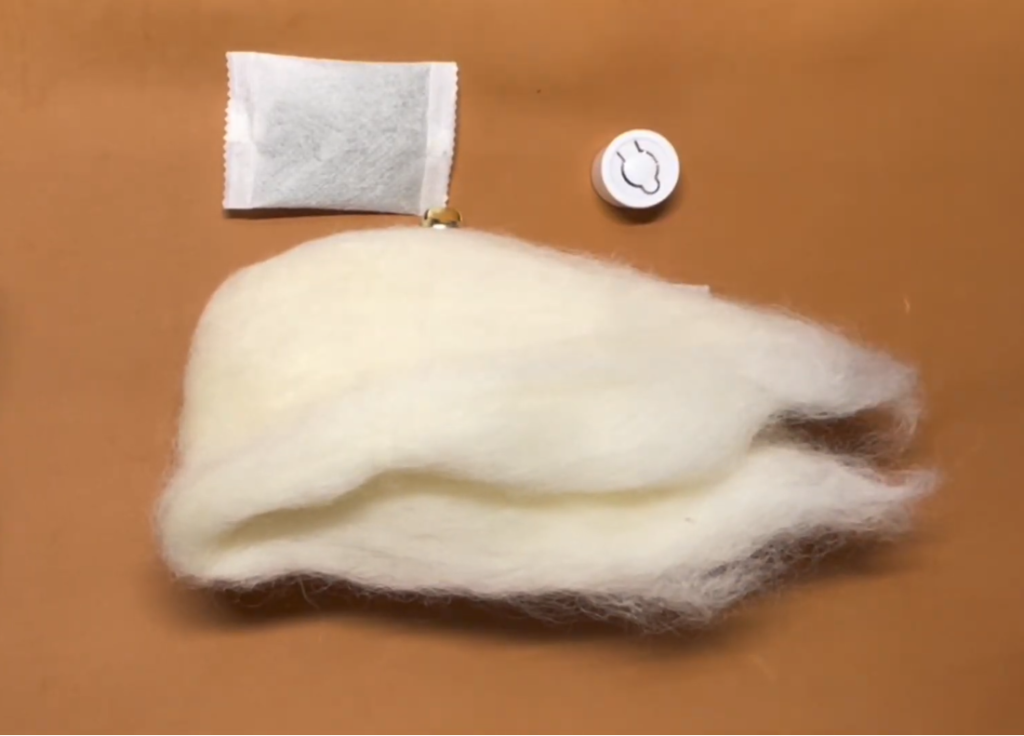
Sound makers (I use two kinds: a jingle bell for one fish, and a press-style squeaker that makes a “meow” sound for the other)
Organic catnip (I learned the hard way: get the bagged kind! More on that in a minute)
Optional: pipe cleaners (if you want a bendable fish)
That’s genuinely it. No sewing. No glue. No special skills required.
A Quick Note on Catnip (From Someone Who Learned the Hard Way)
My first few fish, I used loose catnip. You know, the kind that comes in a little bag, all fluffy and loose.
Big mistake.
Every time I tried to wrap it up with the sound maker, catnip would go everywhere. All over my table, all over my lap, all over the floor. Lucky would come running thinking it was treat time, and I’d spend more time cleaning up than crafting.
Then I discovered bagged catnip—the kind that comes in little teabag-style pouches. Total game changer.
Now I just tuck the whole little bag inside with the sound maker. No mess, no fuss, and Lucky gets just as excited. If you can find catnip teabags or make your own little pouches, do yourself a favor and use them. Your future self (and your vacuum cleaner) will thank you.
The Four Simple Steps
Step 1: Create the Core – Build a Pocket for the Good Stuff
This is the trickiest part of the whole process, and I’ve figured out a method that makes it way easier for beginners.
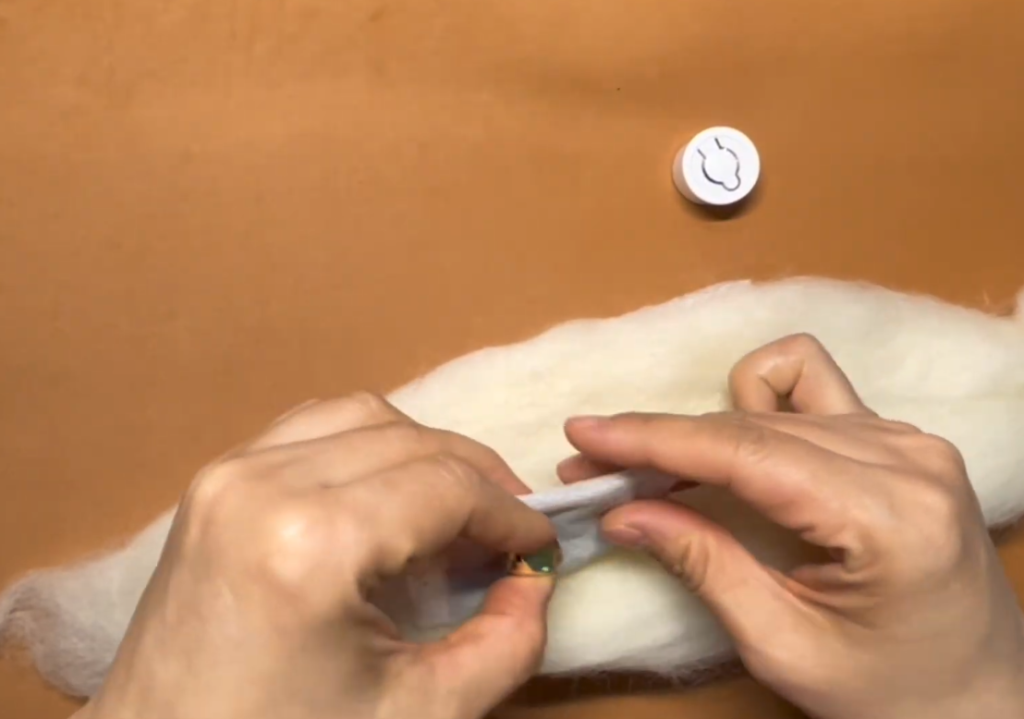
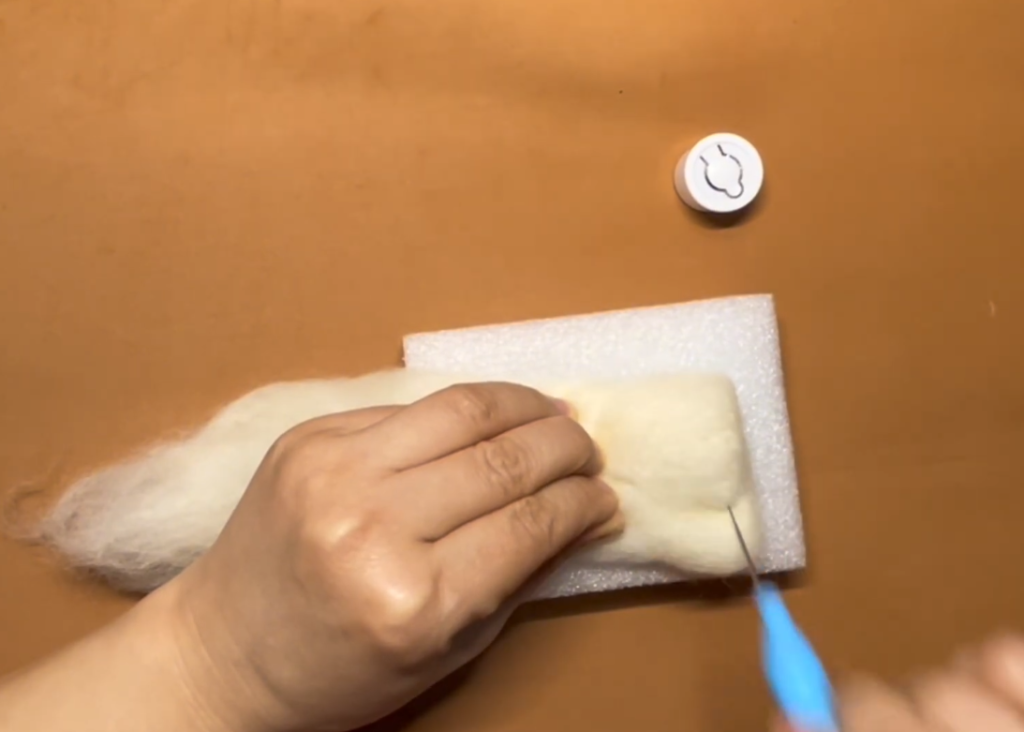
Start by taking a small handful of core wool—undyed, natural wool works great for the inside. Place it on your foam pad and start poking with your felting needle. Your goal here is to create a flat, slightly firm piece of felt. It doesn’t need to be perfect—just firm enough to hold its shape.
Keep poking until the wool feels solid but still flexible. You’re essentially making a little felt “blanket.”
Now here’s the clever part: fold that piece of felt in half, like a tiny book. Inside the fold, place your sound maker (bell or squeaker) and your catnip pouch. Position them toward the center so they’ll be surrounded by wool.
Now gently hold the folded edges together and start poking around the perimeter. You’re sealing the edges, creating a little pocket that traps everything inside. The barbs on the needle will tangle the top and bottom layers together, forming a sealed pouch.
Poke all around the edges until you’re confident nothing can escape. Give it a gentle squeeze—if you feel the sound maker moving around inside, that’s perfect. If it feels like it might fall out, poke the edges a bit more.
This method is so much easier than trying to wrap loose wool around everything and hoping it stays put. The pre-felted “blanket” gives you something solid to work with, and the folding technique means you’re not fighting to keep everything contained while you poke.
Take about 10 minutes with this step. Get it right, and the rest of the process flies by.
Step 2: Shape the Body – From Pouch to Fish
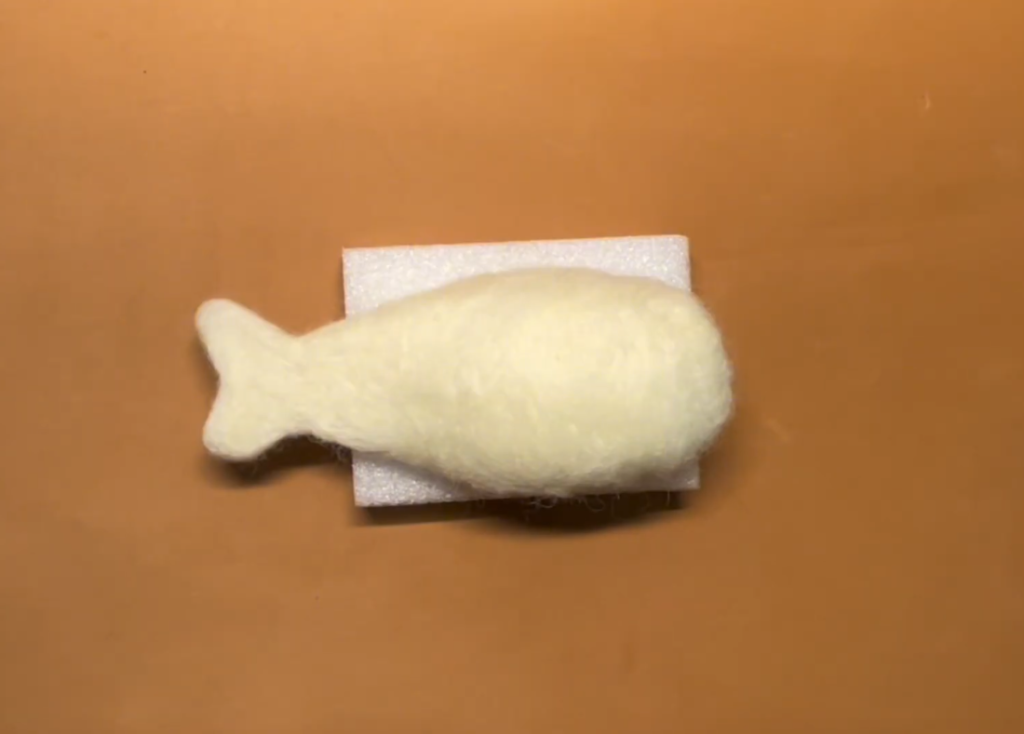
Now you have a little felt pouch with Lucky’s favorite things hidden inside. It probably looks like a lumpy oval. Perfect. That’s exactly what we want.
Start adding more core wool to build the basic fish shape. You’re aiming for three things:
A rounder, thicker head section (this is where the sound and catnip live)
A body that gently tapers toward the tail
A slight curve, like a fish swimming through water
Add wool bit by bit. Take a small amount, place it where you need more volume, then poke to attach. Keep turning your fish as you work, checking it from all angles.
This is where the fish really starts to come alive. You’re not forcing it—you’re coaxing it. The wool responds to your touch, slowly becoming what you imagined.
Size matters. I learned this the hard way with my first whale-sized disaster. Aim for about 6 inches (15 cm) long. This is the sweet spot—big enough for a cat to grab with both front paws and kick with their back feet, small enough to carry around proudly.
Don’t stress about perfection. Real fish aren’t perfectly symmetrical. A slightly lumpy body, a gently uneven curve—that’s character. That’s proof it was made by human hands, not a machine.
This step takes about 15-20 minutes. By now, you’ll probably be in the zone. The outside world fades away. There’s just you, the wool, and the quiet rhythm of poking.

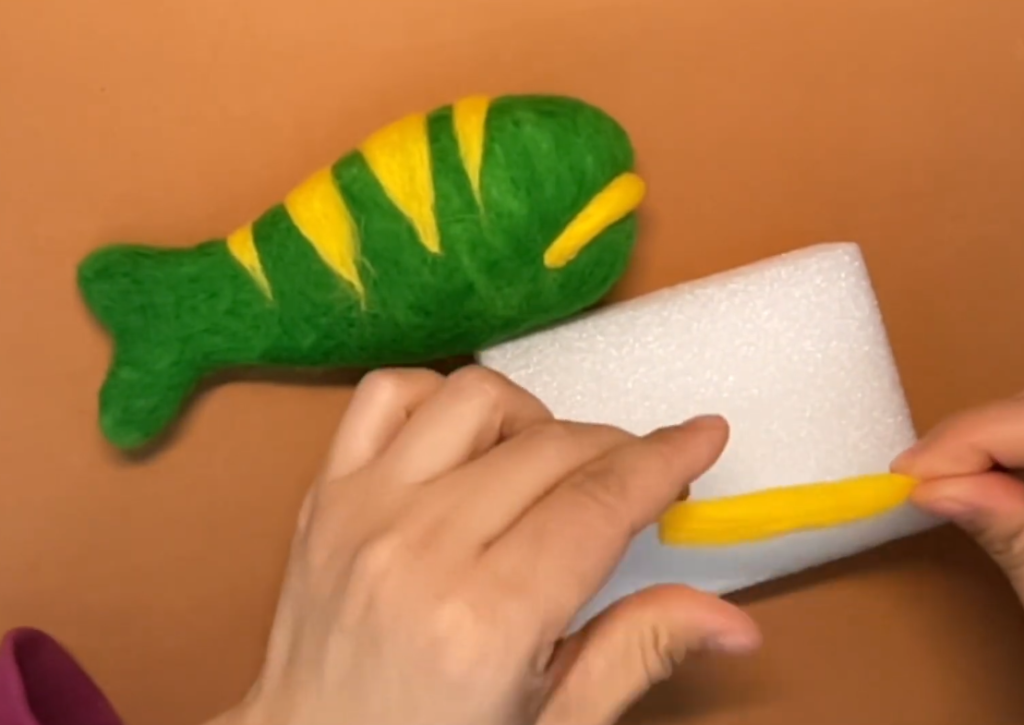
Step 4: The Finishing Touches – Details That Make It Special
The final step is where your fish goes from “cute blob” to “actual fish that Lucky will stalk for hours.”
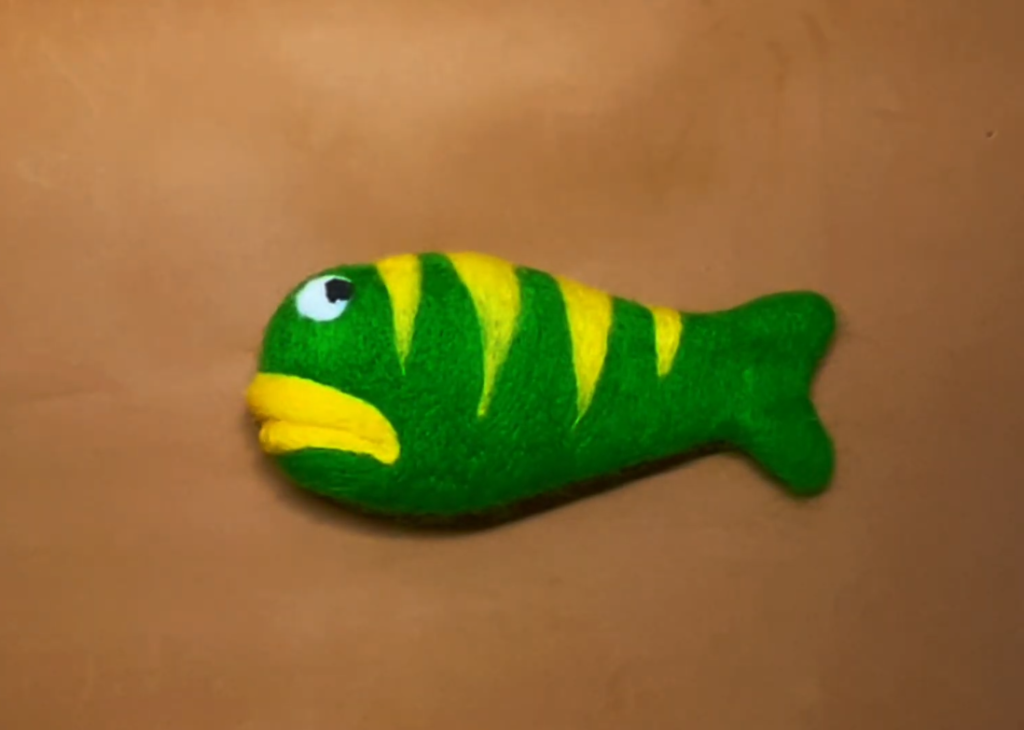
Eyes: Take tiny amounts of white wool. Roll into two small balls between your fingers. Place them on the head, one on each side. Poke gently to attach. Then add even smaller black dots in the center for pupils. Or skip the pupils for a goofier look. I’ve done both—Lucky doesn’t seem to care either way.
Mouth: A tiny line of dark wool. Curve it up for the happy fish. Curve it down for the grumpy one. This little detail makes each fish feel like it has its own personality.
Fins: Create small, flat triangles of wool for the dorsal fin (on top) and pectoral fins (on the sides). Attach with careful poking. Make them thin so they’re flexible and fun for Lucky to nibble.
Gills: A small curved line behind the eye adds a touch of realism. Not necessary, but it makes me happy.
Work slowly. Details take patience, but they’re what make your fish special. And honestly? The slow, careful poking is just as relaxing as the rest of the process.
When you’re done, give the whole fish a final once-over. Poke any loose spots. Smooth any rough areas. Shape the tail one last time.
Now hold it in your hand. Feel its weight. Admire your work.
You just made that. From fluff. With your own two hands.
The full tutorial video is available here:
The Moment of Truth: Giving It to Lucky
This never gets old.
I remember the first time I gave Lucky a fish that was actually the right size. I set it on the floor, heart pounding like a nervous parent. He padded over, sniffed it. His ears perked up at the jingle.
Then he pounced.
Grabbed it with both front paws, kicked with his back feet—the bunny kick, every cat owner’s favorite move. Tossed it in the air. Chased it across the room. Carried it around in his mouth for the next hour.
I sat on the floor, watching him, grinning like an idiot.
That feeling? You can’t buy it at a pet store.
Why Lucky Loves These Fish (And Your Cat Will Too)
I’ve thought a lot about why Lucky goes so crazy for these homemade fish. Here’s my theory:
They smell like me. I handle the wool throughout the whole process. My scent is all over it. For a cat, that’s comfort.
They smell like catnip. Obvious, but important. And the bagged kind stays fresh longer, so the scent lasts.
They make noise. The jingle bell sounds like small prey moving. The “meow” squeaker triggers curiosity—it sounds like another cat, which is apparently fascinating.
They’re the perfect size. Big enough to grab and kick, small enough to carry. The Goldilocks of cat toys.
They have personality. Happy fish and grumpy fish give Lucky options depending on his mood. (Yes, I’m that cat mom.)
Tips From My Felting Journey
I’ve made a lot of fish by now. Some are beautiful. Some are… characterful. Here’s what I’ve learned:
Poke at an angle, not straight up and down. Straight pokes create little divots. Angled pokes smooth the surface.
Poke gently. You’re tangling fibers, not attacking the wool. Gentle, rhythmic pokes work better than aggressive stabs.
Keep your fingers back. Those needles are sharp. I have the Band-Aids to prove it.
Work on foam. Always. The foam pad protects your needle and your table. No exceptions.
If it’s not working, add more wool. Can’t get the shape right? Add a thin layer and poke some more. You can always add, but you can’t subtract.
Don’t aim for perfect. Your cat won’t care if the eyes are uneven. They care about how it feels, how it smells, and how it moves. Your slightly imperfect, handmade-with-love fish might become their favorite toy ever.
Beyond the Fish
Once you’ve mastered the fish, the possibilities are endless.
I started with a simple wool ball—and honestly, Lucky still plays with those. They’re quick to make, great for batting around.
From there, I moved to fish. Now I’m experimenting with mice (smaller, simpler, perfect for hiding). Maybe birds next. Or lizards.
Each one follows the same four steps:
Create a felt pocket for sound + catnip
Shape the body
Add color
Add details
The skills you learn making one fish apply to everything else.
Why This Tutorial Works for Beginners
I remember what it felt like to be completely new to felting. I watched videos. I read posts. I bought supplies and then stared at them, intimidated.
Here’s the thing I wish someone had told me: you can’t mess this up.
Wool is forgiving. If you don’t like how something looks, you can poke it some more. You can add more wool. You can reshape it. There’s no wrong way to do this.
And that first-step method—felting a flat piece first, then folding it around the good stuff? That was a game changer for me. No more wrestling with loose wool and spilled catnip. Just a simple, clean way to build the core.
This easy felted cat toy tutorial is designed for people who have never held a felting needle. The steps are simple. The instructions are clear. And there’s zero pressure to be perfect.
Because honestly? Your cat doesn’t care about perfect.
They care that you made something for them. With your own hands. With love.
Ready to Make Your First Fish?
Clear your table. Put your phone away. Pour yourself a cup of tea (it will get cold—this always happens—but that’s okay).
Take a deep breath.
Then start poking.
Your cat is going to love their new fish. But you know what? You might love making it even more.
Want everything in one box?
My Easy Felted Cat Toy Kit has everything you need:
Premium wool in fish colors
Four felting needles (in case one breaks—ask me how I know)
Foam work pad
One jingle bell + one “meow” squeaker (so you can make both a happy fish and a grumpy fish)
Bagged organic catnip (no mess, no stress)
Step-by-step picture guide
No hunting for supplies. No guessing. Just open the box and start creating something your cat will adore.
👉 [Shop the Easy Felt Fish Kit]
Have you made something for your cat? I’d LOVE to see it. Tag me in your photos or drop a comment below. And tell me—would your cat be a happy fish fan or a grumpy fish fan? I’m genuinely curious! 🐟