
The timeless beauty of a rose has inspired artists for centuries. Now, imagine capturing that beauty not with paint or pencil, but with the soft, sculptural medium of wool. Needle felting allows you to create a rose that will never wilt—a lasting emblem of nature’s perfection that you can hold in your hands. Far from being an overly complex craft, felting a rose has been refined into a surprisingly accessible and meditative process. With a simplified method that cuts down the daunting number of petals, creating a stunning felted rose is an achievable and deeply rewarding project for crafters of all levels. The result is a durable, personal piece of art. And for an extra touch of magic, a drop of rose essential oil can imbue your creation with a subtle, lasting fragrance, engaging the senses in a way that only a handmade object can. This comprehensive guide will walk you through every step of how to felt a rose, proving that you can successfully craft your own everlasting bloom.
Introduction: The Joy of Creating “Never-Wilting Love”
Learning how to make a needle felted rose is a journey into mindful creation. The repetitive motion of the needle is calming, and watching a tangle of wool transform into a delicate, structured petal is truly magical. Unlike fresh flowers, your felted rose is a permanent fixture of beauty—immune to time and season. It makes for an extraordinarily thoughtful gift, symbolizing enduring care, or a beautiful act of self-care as you dedicate time to a creative pursuit. This guide breaks down the process using an efficient, beginner-friendly method that focuses on shaping and color blending to achieve realism without overwhelm. By the end, you’ll have all the knowledge needed for how to felt a rose flower. For those who want a seamless start with all premium materials included, our curated Needle Felting Rose Kit provides everything you see here, along with supportive video tutorials.
Part 1: Materials You’ll Need
To start your project on how to create a felted rose, you will need:
Wool Roving: Core colors: Red (for primary petals), Burgundy/Maroon (for shadows and depth), and Green (for the calyx).
Felting Needles: A medium gauge needle (like a 36 or 38) for shaping, and a fine needle (40) for details.
Felting Surface: A dense foam pad.
Pipe Cleaners (Chenille Stems): Two green ones for the stem.
Rose Essential Oil (Optional but Recommended): This final touch adds an authentic, sensory dimension to your finished rose, making it a truly multi-sensory masterpiece.
Part 2: Crafting the Foundation – The Stem & Calyx
These quick initial steps in how to needle felt a rose establish a sturdy base for your bloom.
Step 1: Creating the Stem (5-Second Step!)
Take two green pipe cleaners and twist them tightly together from end to end. This instantly gives you a strong, poseable stem—the fastest part of learning how to felt a rose flower!
Step 2: Making the Calyx (5 Simple Leaves)
Take a small puff of green wool.
Wrap it loosely around your index finger, slide it off, and fold it in half at the loop.
Gently roll the loose ends to form a leaf tip.
Place it on your foam pad and use your needle to lightly felt the wider base into a leaf shape. Repeat to make five calyx leaves. The video guide in our kit clearly demonstrates this easy technique.
Part 3: Sculpting Lifelike Petals – The Simplified Method
This is the core of how to build a felted rose. Our refined method uses 10-12 petals in three layers, with a color-blending technique that adds incredible depth easily.
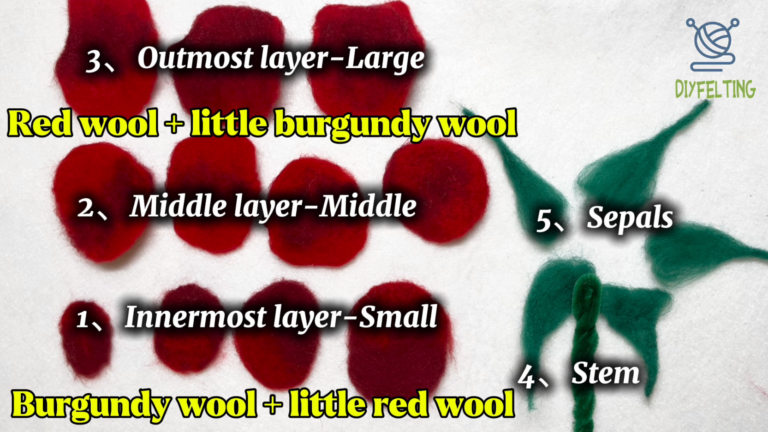
The Simplified Color Strategy for Realism:
Inner Layer (3-4 petals): Use burgundy wool as the base. Add a tiny tuft of bright red wool to the top edge before felting is complete.
Middle & Outer Layers (4 petals each): Use bright red wool as the base. To create natural shadow and curvature, blend a small amount of burgundy wool into the center area of the petal on both sides as you shape it. This two-sided shading eliminates the need to orient a “right side,” making assembly simpler and the effect more realistic.
Step-by-Step Petal Formation:
Shape: Start with small, loose ovals for inner petals. For each subsequent layer, use more wool to create progressively larger ovals or teardrop shapes.
Felting & Shading: Place your red wool oval on the pad. As you begin to needle it into shape, add a small wisp of burgundy wool to the center. Felt thoroughly, then flip the petal and repeat the burgundy shading on the other side. Felt until the base is firm and the edges are softer.
Layer Sizing:
Inner Layer: 3-4 small ovals.
Middle Layer: 4 larger, gently curved ovals.
Outer Layer: 3-4 large ovals. Curl the upper edges outward as you felt to create a beautiful, blooming effect.
Part 4: Assembly & The Fragrant Finale
Learning how to assemble a needle felted rose is straightforward with our layered approach.
Start with the Center: Wrap the smallest inner petal tightly around the top of your stem. Felt the base securely.
Build Outward: Add the remaining inner petals, then the middle layer, and finally the outer-layer petals around the core, overlapping as you go. Felt each base firmly to the layer beneath it.
Attach the Calyx: Position the five green leaves around the flower base and felt them on securely.
The Magic Touch – Rose Essential Oil: Once your rose is complete, add 1-2 drops of pure rose essential oil to the wool petals. Gently rub them together to disperse the scent. This transforms your craft into a fragrant, sensory masterpiece—a symbol of “never-wilting love.”
Conclusion: Your Beginner-Friendly, Everlasting Bloom
You’ve done it! By following this guide, you’ve mastered the simplified and satisfying process of how to felt a rose. You’ve proven that with a clear method, creating a stunning, professional-looking felted flower is within your reach. This durable and now fragrant work of art is a testament to your creativity—perfect for gifting or as a special keepsake to brighten your own space.
We hope this guide has ignited your passion for needle felting. If you’re looking for the most straightforward way to begin, with all the perfectly matched materials and guidance in one place, our Needle Felting Rose Kit is designed for your success. It includes premium wool, tools, rose essential oil, and access to a detailed video tutorial for every step.
Embrace the craft of how to do needle felting a rose and create your own timeless token of beauty.
Happy Felting!
