Ready to Level Up? Let's Begin.
Needle Felting for Beginners: What to Know and What to Avoid
Needle felting is a craft where you use a barbed needle to repeatedly poke loose wool into dense shapes. You need just three items: wool roving, a felting needle (a 38-gauge star needle works best), and a foam pad. Start by practicing a small ball or a flat shape (like a circle or oval). Once you’re comfortable with the basic motion, try more challenging forms: a flower, a plant, a coaster, or a simple animal. Each step builds your control and confidence.
I’ve been needle felting for nearly two years now, starting from self-exploration and now designing my own creations for my small shop. Every beginner I’ve spoken to has asked the same questions — and made the same mistakes I made when I first started. This guide collects everything I wish I’d known on day one. It’s not theory. It’s what actually works when you’re holding a needle for the first time. By the end, you’ll have a clear path to your first finished piece — and the confidence to start making it today.
What is Needle Felting?
Understanding the Creative Process Before you pick up your first needle, it’s helpful to understand the fascinating process behind this unique craft. Needle felting is a dry felting method that uses special barbed needles to interlock and tangle wool fibers together. Unlike wet felting that uses water and soap, needle felting relies entirely on the mechanical action of the needle. Here’s how the magic happens: When you repeatedly poke a clump of wool roving with a felting needle, the tiny barbs on the needle catch the natural scales on the wool fibers, pulling them downward but preventing them from pulling back up. With hundreds or thousands of strategic pokes, these fibers become permanently entangled and compressed, gradually transforming from soft, fluffy wool into dense, firm felt. This versatile art form allows you to create everything from simple 3D sculptures and beautiful jewelry to intricate decorative items and even felted paintings.
Your First Toolkit: Essential Needle Felting Supplies
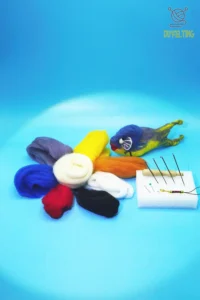
The good news about starting needle felting for beginners is that you don’t need expensive equipment or a room full of supplies. However, a few key tools are absolutely essential for success and safety. Sourcing these items individually can be overwhelming for newcomers, which is why investing in a comprehensive beginner needle felting kit is often the smartest approach. A quality kit ensures you have compatible, high-quality materials specifically curated for your first projects.
Let’s explore what you’ll typically find in a starter kit and why each component matters:
1. Wool: Your Sculpting Medium
Think of wool as your clay or raw material. Specifically, you’ll be working with wool roving – wool that has been cleaned, carded (brushed to align fibers), and drawn out into a long, continuous strand. For those just learning how to start needle felting, understanding that different wool types have distinct felting properties is crucial:
Merino Wool: Known for its exceptionally fine fibers and soft, luxurious feel, Merino is wonderful for projects where softness is key. However, it felts at a noticeably slower pace than other wools. While it creates a beautifully smooth finish, beginners might find the extra time required to shape 3D sculptures tests their patience.
Romney Wool: This is a coarser wool with a more pronounced scale structure, which translates to very rapid felting speed. While this can be advantageous for experienced felters, novices may find the wool becomes hard and dense before they’ve had adequate time to perfect their shapes, potentially leading to over-felted, undersized creations.
Corriedale Wool: Widely considered the ideal choice for beginner needle felting projects, Corriedale strikes the perfect balance. Its medium-grade fibers felt at a manageable, controlled pace – slower than Romney (giving you a forgiving “window” to adjust your work) but faster than Merino (providing satisfyingly quick visual results that help build confidence).
Critical Beginner Advice: We strongly advise against purchasing raw wool straight away when you’re just starting out. It’s surprisingly easy to choose the wrong type or quality, leading to unnecessary expense and frustration that can discourage you before you truly begin. The simplest and most effective approach is to begin with a comprehensive beginner needle felting kit . These kits provide pre-measured, high-quality wool (often Corriedale) perfectly suited for the included project, along with detailed, step-by-step instructions. This smart approach eliminates guesswork and virtually guarantees a positive first experience. After completing a few kits and understanding how different wools behave, you’ll be perfectly equipped to confidently purchase and select your own materials.
One Simple Trick to Tell Polyester and Pure Wool Apart ⇓⇓⇓
2. Felting Needles: The Engine of Your Craft
Felting needles aren’t ordinary sewing needles – they’re specialized tools with downward-facing barbs along their shafts. These barbs do all the work of tangling the wool fibers. Needles come in various sizes (gauges) that serve different purposes throughout the felting process:
Coarse Needles (Low Gauge like 36G): These thicker needles have larger, more pronounced barbs. They’re ideal for the initial stages of your project – perfect for quickly forming the basic shape and compacting large amounts of loose wool efficiently.
Medium Needles (38 Gauge): Your all-purpose workhorse needle. Once your basic shape is established, the medium needle becomes your go-to tool for most of the felting process, offering a good balance of felting speed and control.
Fine Needles (High Gauge like 40-42G): These delicate needles have tiny, subtle barbs designed for final detailing and creating smooth surfaces. They’re perfect for adding facial features, smoothing out bumps, and blending color transitions, leaving nearly invisible holes in your work.
3. The Felting Surface: Your Essential Workbench
This is perhaps the most important safety rule in needle felting: Never, ever felt directly on a hard surface like a table, desk, or your lap. Doing so is a primary cause of needle breakage and potential injury. Your work surface, often called a “felting mat,” serves three vital functions: it cushions your work, protects your needle tips from hitting hard surfaces, and provides a stable, supportive base. Several types are available, each with unique characteristics:
Foam Pads: This is the most common and highly recommended starting point for beginners. Inexpensive, lightweight, and readily available, foam pads provide uniform resistance that’s easy to work with. Most individual project kits include a foam pad due to its affordability and convenience. While it will eventually develop holes and require replacement, it represents the perfect low-commitment way to start your felting journey.
Pure Wool Felt Mats: Denser and significantly more durable than foam, a wool mat is a favorite among many experienced felters. Because it’s made of the same material you’re working with, it offers excellent, firm support and gently “grips” your wool slightly, which can be surprisingly helpful during the shaping process. You’ll often find these higher-quality mats included in larger or more comprehensive combination kits.
Bristle Brushes: These specialized surfaces feature stiff bristles that hold your wool securely in place as you work. They’re typically used for creating specific shapes (like flat-backed animals or ornaments) directly on the bristles. They offer fantastic support from underneath but serve a more specialized purpose than all-purpose foam pads.
Our Clear Recommendation for Beginners: If you’re purchasing a work surface separately, start with a simple foam pad. It’s the most cost-effective way to learn proper technique and discover your personal preferences without a significant financial investment. As you complete more projects and your skills develop, you can confidently explore more durable and specialized options like wool mats or bristle brushes.
4. Crucial Safety & Finishing Tools
Finger Guards: Let’s be perfectly clear: this is not an optional accessory, especially for beginners. A good leather finger guard is one of the best investments you can make. It creates a essential barrier between your skin and the incredibly sharp felting needle, preventing painful pokes that can ruin your creative flow and discourage you from continuing.
Small, Sharp Scissors: A quality pair of small, sharp-pointed scissors is indispensable for the finishing touches. You’ll use them for precisely trimming stray fibers, cleaning up your shapes, and adding fine details to your creations.
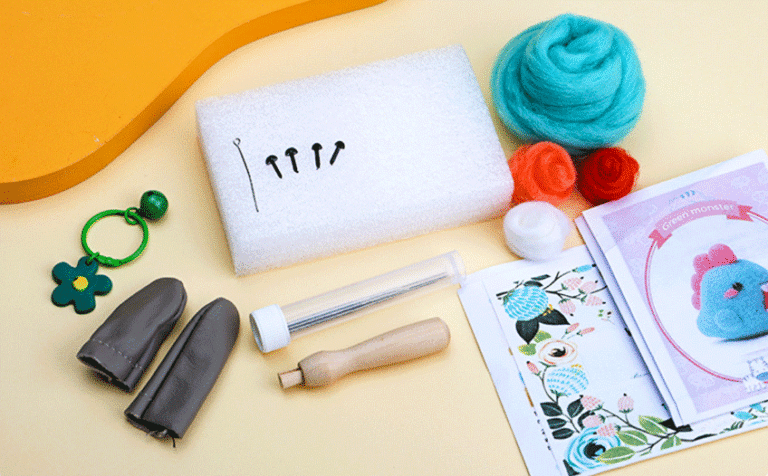
Beginner felting kits typically include the following items: wool roving in various colors, needles, a felting pad, instructions, decorative accessories, and sometimes finger guards and wooden handles. More complex kits may also include tools like scissors. For more information on felting kits or tools, click DIY FELTING to learn more.
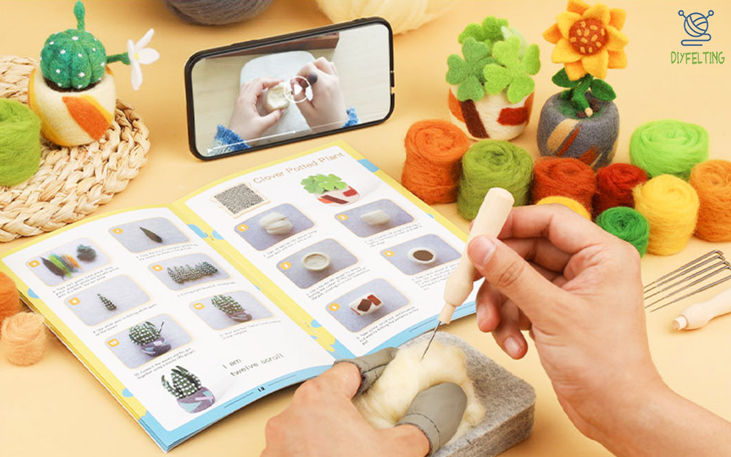
A Step-by-Step Beginner Needle Felting Guide
Now that you’re familiar with your tools, let’s put theory into practice by creating a simple ball. This fundamental shape forms the foundation for almost every easy needle felting project you’ll undertake, making it the perfect starting exercise.
Step 1: Form a Loose Core
Begin by pulling off a modest amount of wool from your roving. Gently roll and tuck it into a loose, airy ball, being careful not to pack it too tightly. The key here is to start with a soft, malleable form that you can compact gradually.
Step 2: Master the Basic Poking Motion
Place your loose wool ball securely on the center of your foam pad. Hold the needle like a pencil, keeping it perfectly straight up and down (90-degree angle to your work surface). Use a firm, controlled, stabbing motion – poking directly in and pulling straight out. The most critical habit to form immediately is to rotate your ball constantly after every few pokes, ensuring an even shape from all angles. Begin this stage with a coarse needle to establish the basic form quickly.
Step 3: Refine and Smooth the Surface
As you feel the wool becoming noticeably firmer and holding its shape, switch to a medium gauge needle. Continue the poking and rotating process, paying extra attention to any lumpy or uneven areas. To achieve a perfectly smooth surface, switch to your fine needle and poke at a very shallow angle, almost skimming the surface. This technique effectively tucks any remaining loose fibers back into the form.
Step 4: Add Details and Color
To add spots, stripes, or other colorful features, gently pull off a small wisp of colored wool and lay it lightly on the surface of your core shape. Using your fine needle, carefully poke around the outer edges of the new color first, gradually working inward to seamlessly blend it into the core wool without disturbing the underlying shape.
What Every Beginner MUST Avoid: Common Mistakes and Safety
This section could save you hours of frustration, sore fingers, and wasted materials. Pay close attention to these needle felting tips for beginners that focus squarely on what not to do.
Mistake #1: Not staying focused while needle felting.
Why to Avoid It:Needle felting differs from other crafts because the needles are quite sharp, so you must concentrate on the task. The most meaningful aspect of needle felting lies precisely in this focus—it allows you to forget your worries and even lose track of time, immersing yourself completely in your creation. That’s why some call it therapeutic DIY. If you plan to watch videos while needle felting, be prepared for pricked fingers. Of course, you can prepare finger guards beforehand.
A deep poke is not only painful but can cause bleeding and halt your creative progress immediately. A simple leather finger guard is your first and most effective line of defense, making the learning process safe and enjoyable.
Mistake #2: Poking at an Angle.
Why to Avoid It: This is the primary cause of needle breakage. When a needle is inserted at an angle, lateral stress is placed on the slender metal shaft. A broken needle can snap and fly unpredictably, creating a real safety hazard. Always, without exception, maintain a vertical, up-and-down poking motion.
Mistake #3: Not Rotating Your Work.
Why to Avoid It: This inevitably leads to flat spots, lumpy sides, and uneven shapes. When you only felt from one direction, you compact fibers only on that side. Make a conscious habit of rotating your project a quarter turn after every few pokes to create a symmetrical, professionally rounded form.
Mistake #4: Using Too Much Wool to Start.
Why to Avoid It: In needle felting, it’s always easier to add wool than to remove it. An overly ambitious starting size can lead to a final product that is much larger and uses more materials than intended. Start with a smaller, more conservative amount than you think you need; you can always build up the shape gradually as you go.
Your First Projects: Easy Needle Felting Ideas
Now that you understand the basics and know what pitfalls to avoid, you’re ready to try these simple, satisfying easy needle felting projects for beginners:
A Perfect Sphere: Don’t underestimate this fundamental exercise. Mastering a perfectly round, smooth ball is the core skill upon which all 3D shapes are built.
A Simple Heart: Start with a basic ball, then gently pinch and strategically felt one end to form a classic heart shape – perfect for ornaments or gifts.
A Cheerful Cherry: Create a small red sphere for the fruit and a tiny green cylinder for the stem. This teaches you how to combine simple elements.
A Decorative Bead: Felt a tight, compact cylinder or cube and carefully poke a hole through it with your needle to create unique, handmade beads for jewelry.
Conclusion: Your Creative Journey Starts Now
Needle felting for beginners is an incredibly accessible, meditative, and immensely satisfying craft. The key to a successful start lies in beginning with the right knowledge, being patient with your progress, and always prioritizing safety. Embrace the learning process, and remember – every expert felter was once a beginner holding a needle for the very first time. Don’t compare your initial creations to the intricate works you see online; instead, focus on the joy and satisfaction of the creative process itself.
You now have a solid foundation and the ultimate guide to begin. So gather your tools, find a comfortable, well-lit workspace, take a deep breath, and make that first, confident poke. A world of woolly, creative possibility is waiting at your fingertips.
FAQ Section
Q: What is truly the best wool for someone just starting needle felting?
A: For those starting needle felting, Corriedale wool is overwhelmingly recommended by experienced felters and suppliers. Its balanced felting speed provides the ideal learning curve, and it’s readily available in most quality beginner kits.
Q: What’s the single most important tip for avoiding broken needles?
A: The two most crucial rules are: 1) Always maintain a straight up-and-down poking motion (never at an angle), and 2) Always use a proper foam or wool work surface. Never force the needle or bend it during use.
Q: Is purchasing a beginner kit really a good value compared to buying supplies separately?
A: Yes, absolutely. A well-curated beginner needle felting kit provides exceptional value. It ensures all components are compatible, saves you the research time and confusion of selecting individual items, and typically includes project instructions that guide you to success, offering greater overall value than piecemeal purchases.
Q: How long should a complete beginner expect to spend on their first simple project?
A: For your very first creation, like a simple ball or heart, set aside about 30-45 minutes. This allows for a relaxed pace and learning the rhythm of the craft. As your skill and speed increase, you’ll find yourself completing similar projects more quickly. More complex projects naturally require additional time.